最近在用egg.js做后台开发,正好遇到需要发送邮件的功能,再此记录一下:
1、下载 nodemailer1
npm install nodemailer
2、QQ邮箱授权
进入QQ邮箱 > 设置 > 账户 >POP3/IMAP/SMTP/Exchange/CardDAV/CalDAV服务
开启POP3/SMTP服务,获取授权码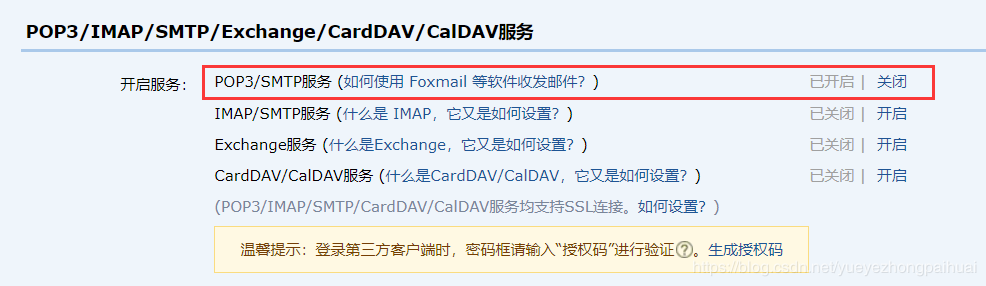
3、使用nodemailer1
2
3
4
5
6
7
8
9
10
11
12
13
14
15
16
17
18
19
20
21
22
23
24
25
26
27
28
29
30
31
32
33
34
35
36
37// 引入nodemailer
const nodemailer = require('nodemailer');
// 封装发送者信息
const transporter = nodemailer.createTransport({
service: 'qq', // 调用qq服务器 发送者的邮箱厂商,支持列表:https://nodemailer.com/smtp/well-known
secureConnection: true, // 启动SSL
port: 465, // SMTP端口
auth: {
user: '[email protected]', // 账号
pass: 'xxxxxxxxxx', // SMTP授权码
},
});
// 邮件参数及内容
const mailOptions = {
from: '[email protected]', // 发送者,与上面的user一致
to: '[email protected]', // 接收者,可以同时发送多个,以逗号隔开
subject: '测试的邮件', // 标题
// text: '测试内容', // 文本
html: '<h2>测试一下:</h2><a href="https://sphard.com">测试SPhard链接</a>',
};
// 调用函数,发送邮件
const res = await transporter.sendMail(mailOptions);
// 判断邮件是否发送成功
if (res) {
ctx.body = {
code: 1,
msg: '邮件发送成功'
};
} else {
ctx.body = {
code: 2,
msg: '邮件发送失败'
};
}
上面是直接使用nodemailer,在实际开发中,我们可以对其进行简单封装,以便调用:
新建app/service/mail.js文件1
2
3
4
5
6
7
8
9
10
11
12
13
14
15
16
17
18
19
20
21
22
23
24
25
26
27
28
29
30
31
32;
const Service = require('egg').Service;
const nodemailer = require('nodemailer');
const transporter = nodemailer.createTransport({
service: 'qq',
secureConnection: true,
port: 465,
auth: {
user: '[email protected]', // 账号
pass: 'xxxxxxxxxx', // SMTP授权码
},
});
class MailService extends Service {
async sendMail(email, subject, html) {
const mailOptions = {
from: '[email protected]', // 发送者,与上面的user一致
to: email, // 接收者,可以同时发送多个,以逗号隔开
subject, // 标题
html,
};
try {
await transporter.sendMail(mailOptions);
return true;
} catch (err) {
return false;
}
}
}
module.exports = MailService;
在测试controller中调用1
2
3
4
5
6
7
8
9
10
11
12
13
14
15
16
17
18
19async testMail() {
const { ctx, service } = this;
const email = '[email protected]'; // 接收者的邮箱
const subject = 'Egg.js邮件';
const html = '<h2>测试一下:</h2><a href="https://sphard.com">测试SPhard链接</a>';
const has_send = await service.mail.sendMail(email, subject, html);
// 判断邮件是否发送成功
if (has_send) {
ctx.body = {
code: 1,
msg: '邮件发送成功'
};
} else {
ctx.body = {
code: 2,
msg: '邮件发送失败'
};
}
}
这就是简单的发送邮件,这个插件还可以上传附件,详情可参考nodemailer文档:https://nodemailer.com